
Car freshies are scented aroma beads baked into a shape and hung in your car. You melt the beads just enough to fuse them in a cookie cutter or silicone mold, thread a string through the top, and loop it over the mirror. The project is a good first one because the supply list is short and a single batch bakes in a home oven. This guide covers melting and shaping the beads. Adding fragrance and color to the loose beads happens first, and that prep lives in How to Make Freshies.
What Are Car Freshies
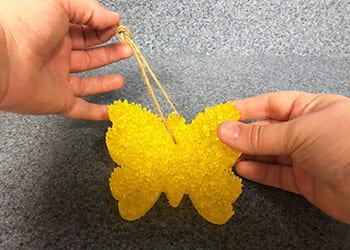
A car freshie is an air freshener made from How to Make Freshies, the small resin beads that soak up fragrance oil and release the scent slowly over time. Scent the beads with fragrance oils, pack them into a cookie cutter or a silicone mold, and bake them briefly so they fuse into a solid shape. Once it cools you thread a string through a hole in the top and hang it from the rear-view mirror.
What a freshie is made of is short: aroma beads, fragrance oil, and optional liquid dye for color. The beads do the work, holding the fragrance and giving the freshie its shape once baked. Because the beads keep absorbing oil, a freshie can be re-scented again and again rather than thrown out when it fades.
What You'll Need
What You'll Need
Check items off as you gather them
Supplies
-
Aroma Beads aroma beads hold the fragrance and form the shape; see How to Make Freshies for scenting them
-
Fragrance Oil from fragrance oils; the beads hold up to 2 ounces per pound, but start at 1 ounce and adjust
-
Cookie Cutter or Silicone Mold metal cookie cutters or silicone molds; pick shapes with no fine detail for your first batch
-
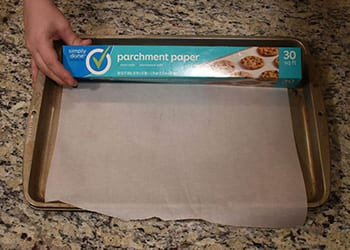
Parchment Paper lines the baking sheet so the freshies release; do not use wax paper, which fuses to the beads
-
A Large Screw or Nail optional to form the hanging hole while the beads are hot
-
String, Jute, or Elastic Thread for hanging the finished freshie
Tools & Equipment
-
Baking Sheet any flat oven tray sized to your oven
-
Oven and Oven Mitts a standard home oven does the job
-
Stirring Utensil a spoon, skewer, or popsicle stick to check whether the beads have fused
Skip ahead to the step-by-step guide
Scent the Beads First
The beads go into the oven already scented, so add fragrance and color before you start shaping. Our aroma beads hold up to 2 ounces of fragrance oil per pound, though 1 ounce per pound is a sound starting point that you can raise once you know how strong you like the throw. Stir the oil and any liquid dye through the loose beads and let them absorb it fully. The full scenting method, including how long to let the beads sit, is in How to Make Freshies.
The Step-by-Step Process
Every oven runs a little differently, so treat the first batch as a test. Bake a small set, note the temperature and time that fuse the beads without melting them flat, and repeat those numbers for the rest.
How to Make Car Freshies
-
1
Preheat the oven
Set the oven to 350 degrees, or 325 degrees if yours runs hot. Test a small batch first to confirm the beads fuse without melting flat at that temperature.

-
2
Line the baking sheet with parchment
Cover the baking sheet with parchment paper so the freshies release cleanly. Do not use wax paper; the beads fuse to it and leave bits stuck to the bottom of every shape.
-
3
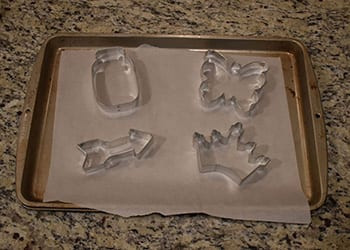
Space the cutters on the sheet
Arrange the cookie cutters or silicone molds with room between them so the beads bake evenly. Keep the shapes in a batch close in size so they finish at the same time.
-
4
Set a screw for the hanging hole
If you plan to hang the freshie, stand a medium screw or nail upright inside the cutter where you want the hole. A screw about an inch long works well. Skip this step if you would rather tie the string around the shape later.

-
5
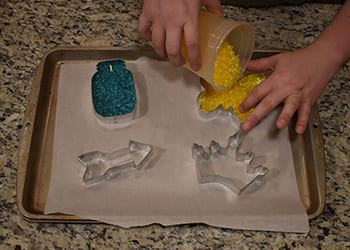
Fill the cutters with beads
Pour the scented beads into each cutter to the depth you want, working around the screw. A thicker layer makes a sturdier freshie that holds more fragrance.
-
6
Press beads into the detail
For cutters with narrow nooks, use a fingertip to tuck beads into the corners and even out the surface. Detailed shapes need this so they fuse fully and keep their outline.
-
7
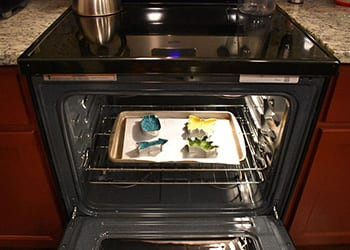
Bake until the beads fuse
Bake 6 to 10 minutes, checking toward the shorter end. Gently tap the top with a spoon or skewer; when the beads stick together but still look loose on top, they are done.

-
8
Cool, then unmold
Let the shapes cool completely. Wiggle each one out of its cutter with gentle pressure, then slide any screw out by pressing the sharp end against the workspace until it backs out.

-
9
Thread the string and hang
Run string, jute, or elastic thread through the hole and knot a loop, or tie the string around a section of the shape. Make the loop wide enough to fit over the rear-view mirror.

Bake Time and Temperature
The bake is the part that takes practice, since every oven and every shape size behaves a little differently. Use this as a starting point and adjust from your first test batch.
Bake Time and Temperature
| Variable | Starting point | What to adjust |
|---|---|---|
| Oven temperature | 350°F, or 325°F if it runs hot | Lower the temp if shapes melt flat before they fuse |
| Bake time | 6 to 10 minutes | Small or thin shapes finish near 6 minutes; large or deep ones near 10 |
| Cookie cutters | Bake at the shorter end | Open metal shapes fuse fast; pull as soon as the beads stick |
| Silicone molds | Bake at the longer end | Deeper detail needs a little more time to fuse the lower beads |
| Doneness check | Beads stick when tapped | Beaded look on top is right; a smooth flat surface is overbaked |
Hanging and Caring for Freshies
Hang a finished freshie from the rear-view mirror, a vent, or anywhere with air movement to carry the scent. Keep it off the dashboard. A dark dashboard in a parked car can reach 180 to over 200 degrees in the sun[1], far past the point where aroma beads soften, so a freshie left there can warp or stick.
Scent fades fastest in a hot car because heat drives the fragrance out quickly. When a freshie weakens, add a few drops of fragrance oils to the surface and let it soak in. The aroma beads keep absorbing oil, so you can re-scent the same freshie several times before the beads wear out, which beats making a new one each time.
If you make freshies to sell or give away, package them with care instructions so buyers know to keep them off the dashboard and re-scent rather than replace. The same method shapes seasonal freshies too, like the Christmas tree freshies. For more aroma-bead and candle projects, browse Step by Step Guides.